Photos by Karen O. Zimmermann (3)
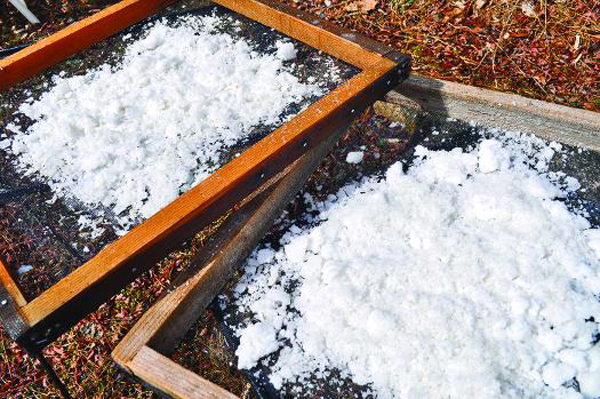
You can finish off your salt on a wooden frame with a screen, or on linen towels.
By Karen O. Zimmermann
After a day on the water I can taste the sea on my lips and feel it in the hairs along my arms. It tingles, and fills me with a salty satisfaction. No, I am not an old salt, that homely term for an experienced sailor who would be coated with far more sea spray than I; I am a salt-harvester.
Salt, which consists of sodium chloride and trace minerals, is essential for life. It regulates the fluid balance of the body—no salt and we die; too much salt, and we die. While I do not use a lot of salt, when I do, I reach for a strong, intensely salty version that I call “Zea Salt.” I make it every winter in the living room of my house.
Gathering and dividing seawater on a chilly day.
Homemade sea salt can be as bright and tasty as any of the world’s artisanal salts, of which there are many, smoked, flavored, or straight. The taste, color, and texture vary with the mineral content There are Hawaiian Black Lava, chunky silver Persian Blue that comes in a little mesh bag with its own grater, and Himalayan Pink. Maldon comes from England, and Fleur de Sel from France. Each has a distinct taste—the delicate Pink is just right for salmon; flaky Maldon is a mild, everyday salt. The Persian Blue is used for eggs and grilled meat. Maine salt, whether bought or home-made, has flavor to rival salt from anywhere.
Sea salt is rewarding to make. The process gets you out by the water, offers lessons about evaporation and crystal formation, and the resulting pure white crystals are intense. Making your own sea salt basically means collecting seawater and evaporating it. It does not require expensive equipment, special skills, or mathematical precision.
The task is best done during the winter months. While you can boil seawater on your stove any time of year, the stove is already up and running during the winter for those of us who heat with wood. This means collecting water when it’s cold outside, which can be challenging. The best time is during an incoming tide, close to high tide, especially if you gather from a dock or pier. Then, the buckets will only need to be hauled a few feet through the air, and the water is fresh from offshore.
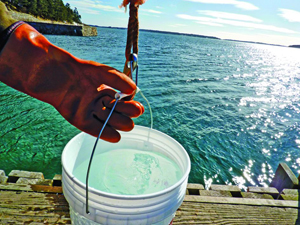
The best time to collect seawater for
your salt is during an incoming tide,
preferably close to high tide when the
water is fresh from offshore.
My husband helps. It does not take long, but we usually linger. The harbor is a different place in winter. The sailboats are gone, the floats pulled up, and we rarely see anyone else. If the forecast calls for a storm, we get a few days’ supply in one trip, since after a storm the agitated water is full of sand and debris. The high tide always seems to be late at night then, and sometimes snow lashes at us and fills the glow from the tall floodlights with a yellow maelstrom. Wrapped in hats and hoods we must shout to be heard. I like these times best.
My salt is seasoned with images of pulling up buckets while looking down at transparent seawater, vibrant green against the sandy bottom, or, bundled up against a bitter wind, ice spray in my face, hauling water at 10 p.m. just before a nor’easter. When I sprinkle crystals over homemade chocolate-covered caramels, or crush some on a fresh Caprese salad, the intense flavor is redolent of the sea in all its moods.
Karen O. Zimmermann is a graphic artist and owner of Z Studio Design in Bar Harbor. She writes a blog that can be found at
www.fromthecreek.com.
Here are a few places where you can buy Maine sea salt online:
www.maineseasalt.com
www.quoddymist.com
www.seachangework.com
www.zeasalt.com
Make your own Sea Salt
12 gallons of seawater yields about 4 cups of sea salt, a year’s supply depending on your consumption. Do note that salt is very corrosive and can pit and scar your woodstove or cook surface.
What you will need:
Bucket with rope
Waterproof gloves
Empty gallon milk jugs and tops
Plastic funnel with screen strainer
Evaporating pan (stainless steel, do not expect it to last more than a few years)
Slotted spoon
Shallow ceramic dish
Wooden frame with screen (helpful, not required)
Heat source
The process
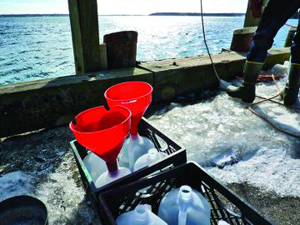
1. Get seawater: Go at mid- to high tide on an incoming tide. This makes it easier to haul up the buckets of water from your source. We line up four milk crates, fill each with four empty one-gallon milk jugs, and fill them using a plastic funnel with a screen in the bottom to filter out seaweed. Line your trunk or the back of the car with plastic, so no saltwater residue is left in the car.
2. Boil it down: Put an evaporating pan on the woodstove or other heat source and fill with seawater, leaving two inches at the top. As the water evaporates, add more. It will begin to get cloudy as the salt content increases. When the water is a cloudy white and you cannot see the bottom, stop adding water. A surface skim will form. Skim off the thin layer of crystals into a dish (I use a ceramic cake pan, about 10" x 18" x 2"). This will be your sea salt.
This all takes several days. Checking and skimming three times a day is enough. Skim until the water is almost gone and the bottom of the evaporating pan contains a sludgy salt. This will taste bitter and is discarded.
3. Finish it off: Some salty water will seep out of the salt crystals in the ceramic dish. Tip the crystals onto a wooden frame with a screen, and allow the remaining water to drip out. You can also spread them out on linen towels to finish drying if you do not make a frame.
Some big chunks will form. Wear gloves to crumble them; handling the salt barehanded is not recommended, as it is very irritating to the skin. The salt will be pretty pristine. There may be one or two specks of black seaweed, which you can just pick out.
4. Store in airtight containers.
So simple. So salt.
Display Title
Sea Salt: The Spice of Life
Secondary Title Text
Bring the sea into your kitchen